


Ever feel like contouring is a bit of a mystery? You see all these amazing transformations online and wonder how they do it. Well, figuring out how to contour for your face shape doesn't have to be complicated. It's all about understanding your features and using a little bit of shadow and light to bring them out. We're going to break it down step-by-step, so you can get that sculpted look you're after, no matter what your face looks like. Let's get started!
Key Takeaways
-
Figuring out your face shape is the first step to successful contouring.
-
Different face shapes require slightly different contour placement to highlight your best features.
-
Oval faces generally need less contouring, focusing on subtle definition.
-
Round faces benefit from contouring that adds angles and length.
-
Square and heart-shaped faces can use contour to soften angles and balance proportions.
How to figure out your face shape in 2 minutes
Look, figuring out your face shape doesn’t have to be some complicated or time-consuming project. In fact, you can nail it in just a couple of minutes with nothing more than a mirror and a little focus. Here’s a fast, foolproof way:
-
Pull your hair away from your face so you can see your full hairline and jaw.
-
Stand in front of the mirror (good lighting really helps).
-
Take note of three main things: the width of your forehead, cheekbones, and jaw, and also, check to see if your face is longer than it is wide.
Here’s a quick cheat sheet to help you match what you see in the mirror to classic face shapes:
|
Face Shape |
Key Features |
|---|---|
|
Oval |
Forehead just a bit wider than jaw; cheekbones are the widest part |
|
Round |
Same width and length; full cheeks, soft curves |
|
Square |
Forehead, cheeks, and jaw are all about even; jawline is sharp |
|
Heart |
Forehead is widest; cheekbones taper to pointed chin |
|
Diamond |
Cheekbones pop out; narrow forehead and jawline |
|
Rectangle |
Longer than wide, but straight sides and pronounced jaw |
When you stare straight ahead, focus on what stands out first—the widest spot is usually your clue. Don’t get caught up in tiny details; shapes overlap more than you think.
If you’re still unsure, pairing this with a product routine (like checking how blush or highlight follows your natural lines) can help—as even the best eyeshadow basics for beginners start with understanding your bone structure. Once you know your shape, contouring starts to make actual sense instead of feeling like a guessing game.
Identifying your face shape is quick and truly sets you up for contouring that flatters your own features, not someone else's. This small step saves you from makeup mishaps down the line.
Contouring an oval face
So, you've got an oval face shape? Lucky you! Oval faces are often considered balanced, so the goal with contouring isn't to change your shape, but to add definition and dimension. Think of it as gently sculpting your already lovely features. We're not trying to reinvent the wheel here, just add a little extra polish.
The key is subtle placement to bring out your natural bone structure.
Here’s how to approach contouring an oval face:
-
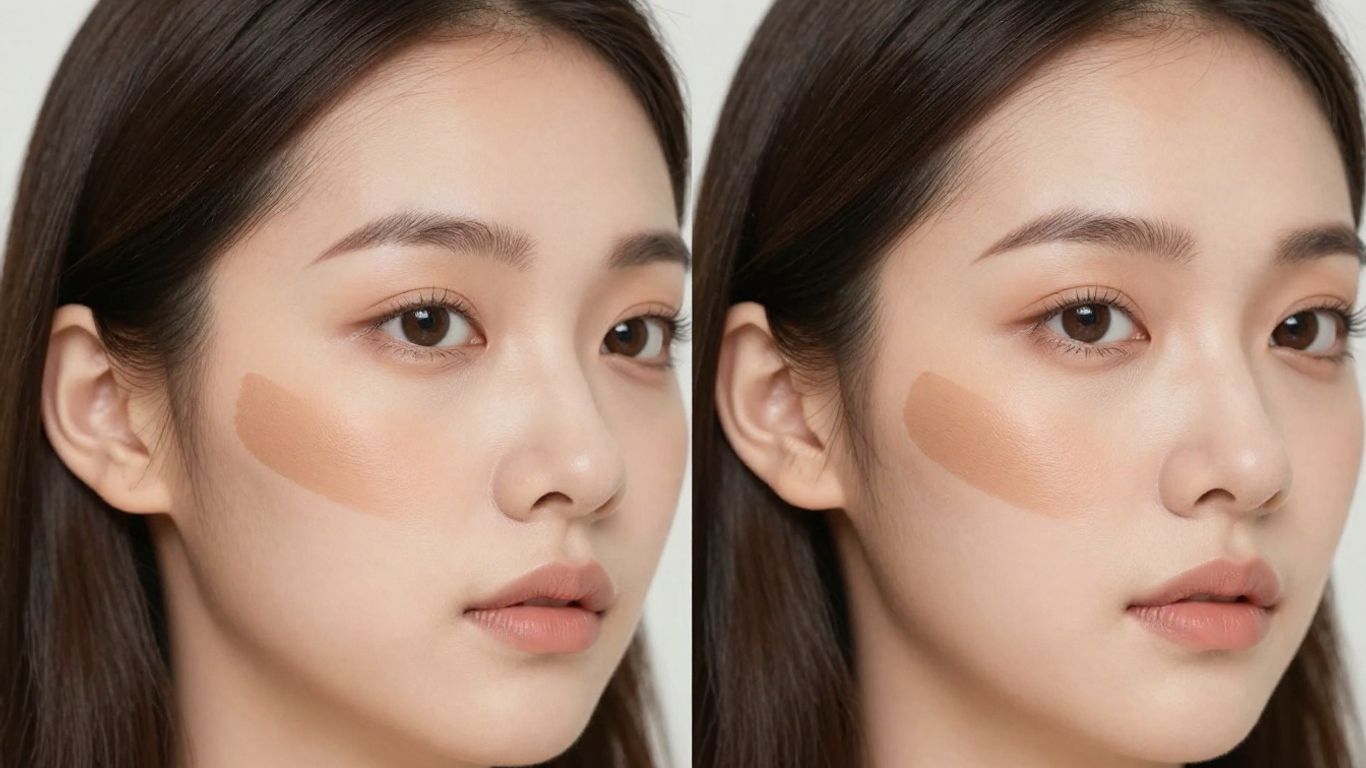
Cheekbones: This is where you'll do most of your contouring. Suck in your cheeks slightly to find the hollows just below your cheekbones. Apply your contour shade in a line following this hollow, starting from your ear and blending downwards towards the corner of your mouth, but stop about halfway. You want to blend it well so there are no harsh lines – think soft shadows, not stripes.
-
Forehead: If you have a slightly larger forehead, you can add a touch of contour along your hairline. This helps to visually shorten the forehead and balance your features. Blend it into your hair so it looks natural.
-
Jawline: For a little extra definition, you can lightly contour along your jawline. This is especially helpful if you want to create a sharper look. Again, blend well into your neck so it doesn't look like you're wearing a mask.
Remember, the idea is to create shadows that mimic your natural bone structure. With an oval face, you have a lot of flexibility, so don't be afraid to experiment a little to see what looks best on you. You can find great tips for contour oval face techniques that work well.
When blending, always use a light hand and build up the color gradually. It's much easier to add more product than to take it away if you go too heavy.
Using a good contour product is important. The Fable Lustre & Lume Contour/Highlighter Palette is designed to give you buildable shades that blend beautifully, making it easy to achieve these subtle sculpting effects. You can use the darker shades for contouring and the lighter ones for highlighting to really make your features pop.
Contouring an oval face is about subtle enhancement. Focus on defining your cheekbones and adding a touch of shadow where needed to create a beautifully sculpted look. This approach respects your natural symmetry while adding a polished finish to your makeup.
Contouring a round face
So, you've got a round face shape and want to add some definition? It's totally doable! The goal here is to create the illusion of angles and length, making your face appear a bit more oval. Think of it like adding shadows to sculpt.
When you're figuring out how to contour round face, placement is key. You want to bring in the sides of your face and define your cheekbones. Start by applying your contour shade just below your cheekbones, blending upwards towards your hairline. This lifts the face. Then, apply a bit of contour along your jawline, blending downwards to slim the lower part of your face. Don't forget the temples! A little contour here helps to shorten the face and add that desired angular look. The key is to blend, blend, blend so there are no harsh lines.
Here’s a simple breakdown for contouring a round face:
-
Cheekbones: Apply contour just beneath your cheekbones, angling upwards towards your ears. This creates a lifted effect.
-
Jawline: Sweep contour along your jawline and blend downwards. This helps to create a more chiseled appearance.
-
Temples: Lightly apply contour to your temples and blend inwards towards your hairline. This can help to shorten the face visually.
-
Sides of the Nose (Optional): If you want to slim your nose, apply a thin line of contour down each side and blend well.
Remember, contouring is all about creating shadows. Think about where the natural shadows would fall on a more angular face and mimic that. It’s about subtle illusions, not drastic changes.
For this, the Fable Contour/Highlighter Palette is a dream. Its buildable formula means you can go subtle or bold. Use the cooler-toned contour shade, Masquerade, to create those shadows. Apply it with a brush or sponge, focusing on the areas we just talked about. Then, use the highlighter shade, Glass Slipper, on the high points of your face – like the tops of your cheekbones and brow bone – to catch the light and further define your features. This palette makes achieving a sculpted look super easy, and it blends out beautifully for a natural finish.
Contouring a round face is about strategic placement to add definition. By focusing on the cheekbones, jawline, and temples, you can effectively create the illusion of a more angular structure. This technique helps to bring balance and dimension to your features.
Contouring a square face
So, you've got a square face shape? Awesome! This shape is all about strong angles and a defined jawline, and contouring is your best friend for softening those features just a bit. The goal here is to add some curves and dimension, making your face appear a little more oval-like if that's what you're going for.
When you contour a square face, think about where you want to create shadows. The main areas to focus on are the jawline and the temples. You want to gently round out those sharp corners.
Here’s a simple breakdown of where to place your contour:
-
Jawline: Apply contour just underneath your jawbone, blending downwards. This helps to create a softer line and minimize any harshness. Start from the ear and work your way towards the chin, but don't go too far onto the chin itself.
-
Temples: Place contour along your hairline at the temples. This helps to narrow the width of your forehead and balance out the stronger jawline. Blend inwards towards the hairline.
-
Cheekbones: While not as critical as the jawline and temples for a square face, you can still add a touch of contour under your cheekbones to add definition. Just be sure to blend it well so it doesn't create a harsh line.
The key to contouring a square face is soft blending. You don't want any obvious lines; you want it to look like natural shadow.
Remember, contouring is all about playing with light and shadow to create the illusion of different shapes. For a square face, we're using it to gently round out the angles and add a touch of softness. It's about subtle adjustments, not drastic changes.
Using the right tools makes all the difference. The Fable Contour/Highlighter Palette is fantastic because it offers shades that blend beautifully, making it easy to achieve that soft, sculpted look. You can use the darker shades to create those shadows along your jaw and temples, and the lighter shades to highlight the high points of your face, like the tops of your cheekbones and the bridge of your nose, to draw attention away from the stronger angles. This palette is great for anyone looking to master makeup techniques.
Don't be afraid to experiment! Contouring is a skill that gets better with practice. Play around with the placement and blending until you find what looks best on you. You're aiming for a natural-looking definition that complements your features. This approach helps you enhance your features effectively.
Contouring a heart-shaped face
Heart-shaped faces often have a wider forehead and cheekbones that taper down to a narrower chin. The goal here is to balance out the proportions, making the forehead appear a bit smaller and adding some width to the lower part of the face. You'll want to focus your contour shade on the sides of your forehead, right where your hairline begins. Blend it downwards towards your temples. This helps to create the illusion of a narrower forehead.
Next, let's talk about those lovely cheekbones. You'll want to apply your contour just below the high point of your cheekbones, angling slightly downwards towards your jawline. This definition helps to bring them into balance with your wider forehead.
The key to contouring a heart face is to add subtle definition without making the lower face look too narrow.
Here’s a quick breakdown for contour heart face application:
-
Forehead: Apply contour along the hairline on the sides of your forehead. Blend well into the hair.
-
Cheekbones: Place contour just beneath your cheekbones, extending from your ear towards the corner of your mouth, but stop about halfway. Blend upwards towards your hairline.
-
Jawline/Chin: You can add a touch of contour lightly under your chin to soften the area and create a more rounded appearance, balancing the wider top of your face. This step is optional but can be helpful.
Remember, blending is your best friend! Use a clean brush or sponge to soften any harsh lines. For a natural finish, consider using the Fable Contour/Highlighter Palette, which offers shades perfect for sculpting and adding dimension. The lighter shades can be used to highlight the center of your chin to draw attention downwards, further balancing your features. This palette makes it easy to achieve a sculpted look that works with your natural bone structure, providing a step-by-step process for defining your facial features.
When contouring a heart-shaped face, think about softening the wider upper areas and gently drawing attention to the lower part of your face. It's all about creating harmonious proportions.
Contouring can seem tricky, but with a little practice, you'll get the hang of it. Focus on blending and using the right placement to bring out your best features. Applying contour correctly can really make a difference in how your makeup looks overall.
Contouring a diamond or rectangle face
Alright, let's talk about contouring for diamond and rectangle face shapes. These shapes have some unique features we can play with to create balance and definition. For a diamond face, the widest part is usually your cheekbones, and your jawline and forehead are narrower. For a rectangle face, it's often longer than it is wide, with a strong jawline and forehead that are similar in width.
The goal here is to soften angles and add width where needed.
Here’s how to approach it:
-
For Diamond Faces: You want to bring attention to your eyes and soften the angles of your cheekbones. Apply contour just below your cheekbones, starting from the top of your ear and angling down towards the corner of your mouth, but stop about halfway. This helps to slim down the widest part of your face. You can also add a touch of contour to your temples to narrow your forehead slightly.
-
For Rectangle Faces: The focus is on shortening the face and softening the jawline and forehead. Apply contour along your jawline, blending downwards to create a softer edge. Also, apply contour to your temples and along your hairline at the top of your forehead. This helps to visually shorten the length of your face.
When you're working with the Fable Contour/Highlighter Palette, you'll find the shades are perfect for these adjustments. Use the darker contour shades to create shadows where you want to recede or slim. For instance, on a diamond face, that hollow under the cheekbone is key. On a rectangle face, the jawline and temples are your main spots.
Remember, contouring is all about creating the illusion of light and shadow. Think about where the natural shadows fall on your face and mimic that with your contour product. It’s not about drastic changes, but subtle sculpting.
Don't be afraid to blend! The key to a natural look is seamless blending. Use a good brush or sponge to soften any harsh lines. You want the contour to look like a natural shadow, not a stripe on your face.
Using the Fable Contour/Highlighter Palette for any face shape
So, you've figured out your face shape, and now you're wondering how to make contouring work for you. The good news is, the Fable Contour/Highlighter Palette is designed to be super versatile. It’s got these creamy shades that blend like a dream, making it easy to sculpt and highlight no matter what your face looks like.
Think of the darker shades as your shadow creators and the lighter ones as your light catchers. For most people, the general idea is to add shadow where you want to recede and add light where you want to bring things forward. The Fable palette makes this super simple with its buildable formulas.
Here’s a quick guide to placement using the Fable Contour/Highlighter Palette:
-
Contour Shades:
-
Apply just below your cheekbones, blending upwards towards your hairline. This helps define your cheekbones.
-
Along your jawline, especially if you want to create a sharper look or soften a stronger jaw.
-
On the sides of your nose to make it appear slimmer.
-
Lightly along your hairline if you have a larger forehead and want to make it appear smaller.
-
-
Highlighter Shades:
-
On the tops of your cheekbones, right above where you contoured.
-
Down the bridge of your nose to make it look straighter and more prominent.
-
On your cupid's bow (the dip above your upper lip) to make your lips look fuller.
-
Under your brow bone to lift your brows.
-
On the center of your forehead and chin to bring those areas forward.
-
The key is to blend, blend, blend! Use a brush or sponge to soften any harsh lines. You want it to look like natural shadows and light, not stripes on your face. The Fable palette’s creamy texture is perfect for this, as it doesn’t just sit on top of the skin.
Don't be afraid to play around. The Fable Contour/Highlighter Palette is forgiving, and you can always build up the intensity or sheer it out. Start with a little product and add more as needed until you get the effect you're going for. This palette is your new best friend for creating dimension.
Contouring mistakes that age you
Okay, so you've got your contour down, but are you accidentally making yourself look older? It happens! Sometimes, the very techniques meant to sculpt can end up drawing attention to things you'd rather soften. Let's talk about a few common slip-ups.
One big one is using a shade that's too dark or too cool. You want a shadow, not a bruise! Think about how the sun naturally hits your face and creates subtle warmth. Your contour shade should mimic that. Applying contour too low on your face can also drag everything down, making you appear tired. Instead, focus on lifting and defining.
Here are some common mistakes to watch out for:
-
Harsh Lines: If you can see where your contour starts and stops, it's too much. Blending is your best friend here. Use a fluffy brush or a damp sponge to really work the product into your skin until it looks like a natural shadow.
-
Wrong Placement: Putting contour in the wrong spots can highlight areas you want to minimize. For instance, contouring too heavily on the forehead can make it look smaller, but if it's too low, it can make your face look heavy.
-
Too Much Product: It's always easier to add more than to take away. Start with a little bit of product on your brush and build it up slowly. You can always go back for more if you need it.
Remember, contouring is about creating dimension, not drawing lines. The goal is to mimic natural shadows, so think subtle and blended. If your contour looks muddy or too obvious, it's probably time to blend more or reassess your shade choice.
Using the Fable Lustre & Lume Contour/Highlighter Palette is great because it offers a range of shades that are designed to create realistic shadows and highlights. You can mix and match to find your perfect tone, and the formulas blend beautifully, making it easier to avoid those aging mistakes. Getting the right shade is key to a natural look, and this palette helps you achieve that sculpted effect.
Don't get discouraged if it takes a few tries to get it right. Makeup is all about practice and finding what works for your unique features. Keep experimenting, and you'll nail that flawless, youthful contour.
Are you making common makeup errors that make you look older than you are? Things like using the wrong blush shade or applying too much powder can add years to your face. Discover the simple fixes to keep your look fresh and youthful. Visit our website to learn more about these common mistakes and how to avoid them!
Frequently Asked Questions
What exactly is contouring, and why should I bother?
Contouring is like using shadows and light to change how your face looks a bit. You use darker makeup to create shadows and lighter makeup to highlight. It's a fun way to play with your features and make them pop, or even change your face shape slightly if you want!
How do I know my face shape if I'm not sure?
It's easier than you think! Look in a mirror, pull your hair back, and trace the outline of your face on the mirror with lipstick or a dry-erase marker. Then, step back and see which shape it looks like: oval, round, square, heart, or diamond/rectangle.
Can I contour even if I'm new to makeup?
Absolutely! Start simple. You don't need a ton of products. Just a little bit of darker and lighter makeup can make a difference. Watch some videos, practice, and you'll get the hang of it quickly. It's all about having fun with it.
What's the difference between contour and bronzer?
Good question! Contour is meant to create shadows, so it's usually a cooler, more matte shade. Bronzer is warmer and often has a bit of shimmer; you use it to add a sun-kissed glow. You can use both, but they do different jobs.
Do I really need a special contour palette?
Not necessarily! You can use matte eyeshadows or even a foundation shade that's a few shades darker than your skin for contour, and a concealer a few shades lighter for highlighting. But palettes like the Fable one make it super easy because they have the perfect shades all in one place.
How do I avoid looking like I have dirt on my face?
The key is blending! You want to make sure there are no harsh lines. Use a fluffy brush or a sponge and gently buff the edges until everything looks smooth and natural. It takes practice, but it's worth it for a seamless look.
Is contouring only for special occasions?
Nope! You can totally wear contour for everyday if you like. Just use lighter shades and blend really well so it looks subtle. It's a great way to add a little definition to your features before heading out the door.
What if I mess up my contour? Can I fix it?
Of course! Makeup is forgiving. If you put on too much or the lines are too harsh, just grab a clean brush or a makeup wipe and gently blend it out or clean up the edges. You can always add more product little by little if needed.

