


Ever look at your makeup bag and feel a little lost when it comes to blush, contour, and highlighter? You're not alone. Getting that sculpted, healthy glow can seem tricky, but it's actually pretty straightforward once you know the basics. This guide will walk you through how to apply blush contour and highlighter so you can feel confident with your makeup routine. We'll break down what each product does, the tools you'll need, and where to put everything for a look that's just right for you.
Key Takeaways
-
Blush adds color to your cheeks, contour adds depth, and highlighter brings light to your face.
-
You'll need your blush, contour, and highlighter products, plus brushes or sponges for application.
-
Generally, you apply these in the order of contour, then blush, then highlighter.
-
Placement is key: contour under cheekbones, blush on apples of cheeks, and highlighter on high points.
-
Blending is super important to make sure everything looks natural and not streaky.
What each product actually does
Let's break down what blush, contour, and highlighter are all about. Think of them as your makeup's best friends for adding dimension and life to your face.
Blush is all about that healthy flush. It mimics the natural color that appears on your cheeks when you're happy or a little active. It brings warmth and a youthful glow to your complexion. A good blush can make your whole face look brighter and more awake.
Contour is for sculpting. It creates shadows where you want to add definition. Think about the natural shadows on your face – contour helps you recreate those. It can make your cheekbones pop or slim down your jawline. It's like playing with light and shadow to shape your features.
Highlighter is the opposite of contour. It catches the light. You apply it to the high points of your face where light would naturally hit. This draws attention and adds a beautiful radiance. It makes your skin look dewy and lit-from-within.
Here's a quick rundown:
-
Blush: Adds color and a healthy flush.
-
Contour: Creates shadows for definition and shape.
-
Highlighter: Reflects light for a radiant glow.
These products work together to give your face structure and dimension. They help bring out your best features by mimicking natural light and shadow play. It's not about changing your face, but about accentuating what's already there.
The tools you need
Okay, let's talk tools. You don't need a whole makeup artist kit, just a few key players.
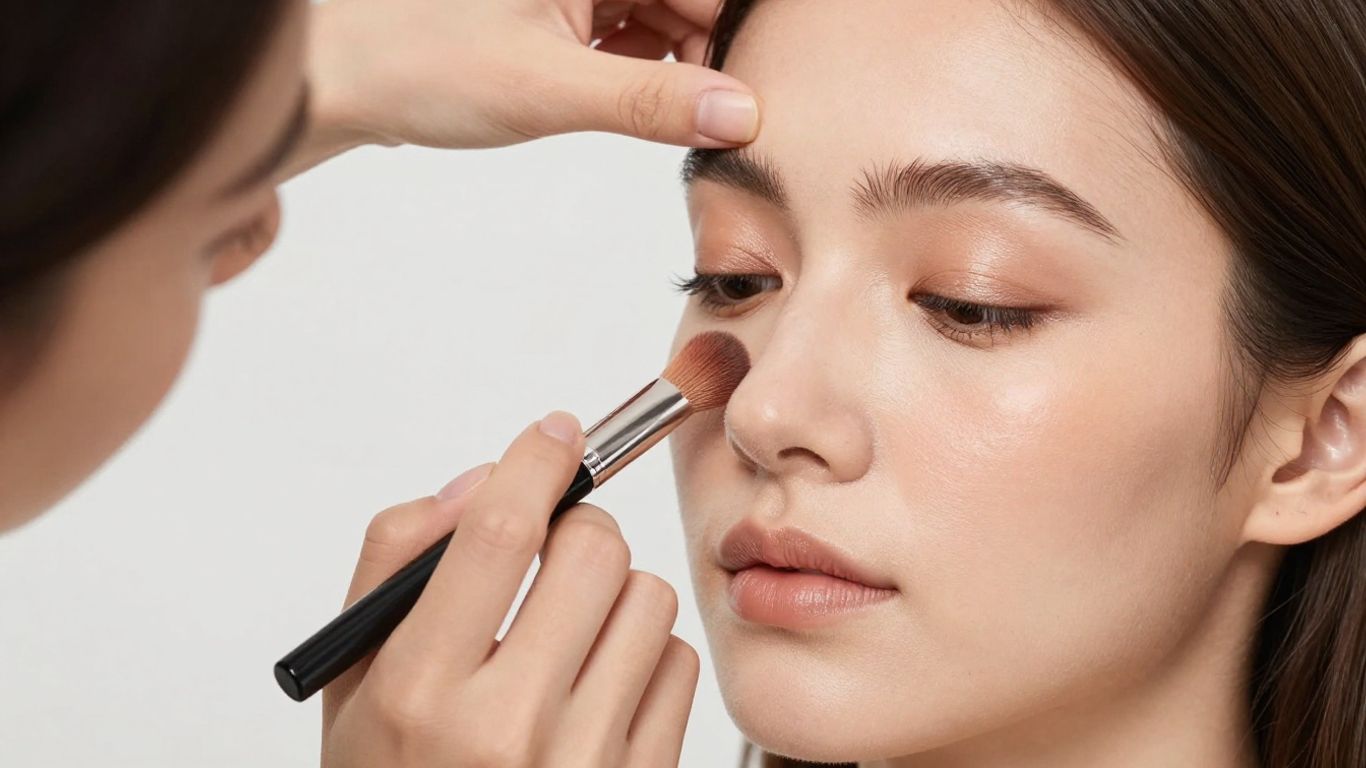
First up, brushes. You'll want a few different types. A fluffy brush is great for sweeping on blush. For contour, a smaller, denser brush works best to really place the color. And for highlighter? A small, precise brush or even your fingertip can do the trick. Having a couple of options is always smart.
Don't forget your sponges! A damp makeup sponge is a miracle worker for blending everything together. It gives you that soft, airbrushed look. It makes a huge difference.
You might think you need a ton of fancy brushes, but honestly, a good fluffy brush for blush, a slightly firmer one for contour, and your fingers or a small brush for highlighter are usually enough to get started. Clean tools are super important, though! Dirty brushes can cause breakouts.
Here’s a quick rundown:
-
Fluffy Brush: For blush application.
-
Angled or Dense Brush: For contour.
-
Small Tapered Brush or Finger: For highlighter.
-
Makeup Sponge: For blending.
Having the right tools makes the whole process so much easier. It's like cooking – good ingredients are important, but the right utensils help you create something amazing. You can find some beautiful blush options to pair with your tools on Fable Cosmetics' blush palettes.
The correct order of application
Okay, so you've got your products, you know what they do, and you're ready to go. But in what order should you actually put them on? It makes a difference.
Think of it like building a house. You need a solid foundation first, right? Makeup is kind of the same. You want to start with your base products.
Here’s the general flow:
-
Foundation and Concealer: These are your base layers. They even out your skin tone and cover any imperfections. Get these done first.
-
Contour: This is where you start sculpting. Contour adds dimension by creating shadows. You want to do this before blush so the blush sits on top and looks natural.
-
Blush: Blush adds color and a healthy flush. Applying it after contour helps it blend nicely into the sculpted areas.
-
Highlighter: This is your final touch. Highlighter catches the light and brings your features forward. It goes on last to really make those high points pop.
So, the order is basically: Base, Shadow, Color, Light. Easy to remember!
This sequence helps each product do its job without getting muddy. You're building up the dimension and color step-by-step. It’s all about creating a natural-looking finish that works with your face, not against it. For example, applying blush after contour allows the color to blend smoothly into the shadows you've created, making your cheekbones look naturally defined. You can find great tips on blush placement for your face shape.
If you're using a contour and highlighter palette, you'd apply the contour shade first to define your features, then follow with blush. Finally, sweep the highlighter over the high points of your face. It’s a simple system that really works. Getting the order right is a big step towards that polished look you're going for. It’s not complicated, just a little bit of planning for your makeup routine.
Where exactly to place each product
Okay, let's talk placement. This is where the magic happens. Getting it right makes all the difference.
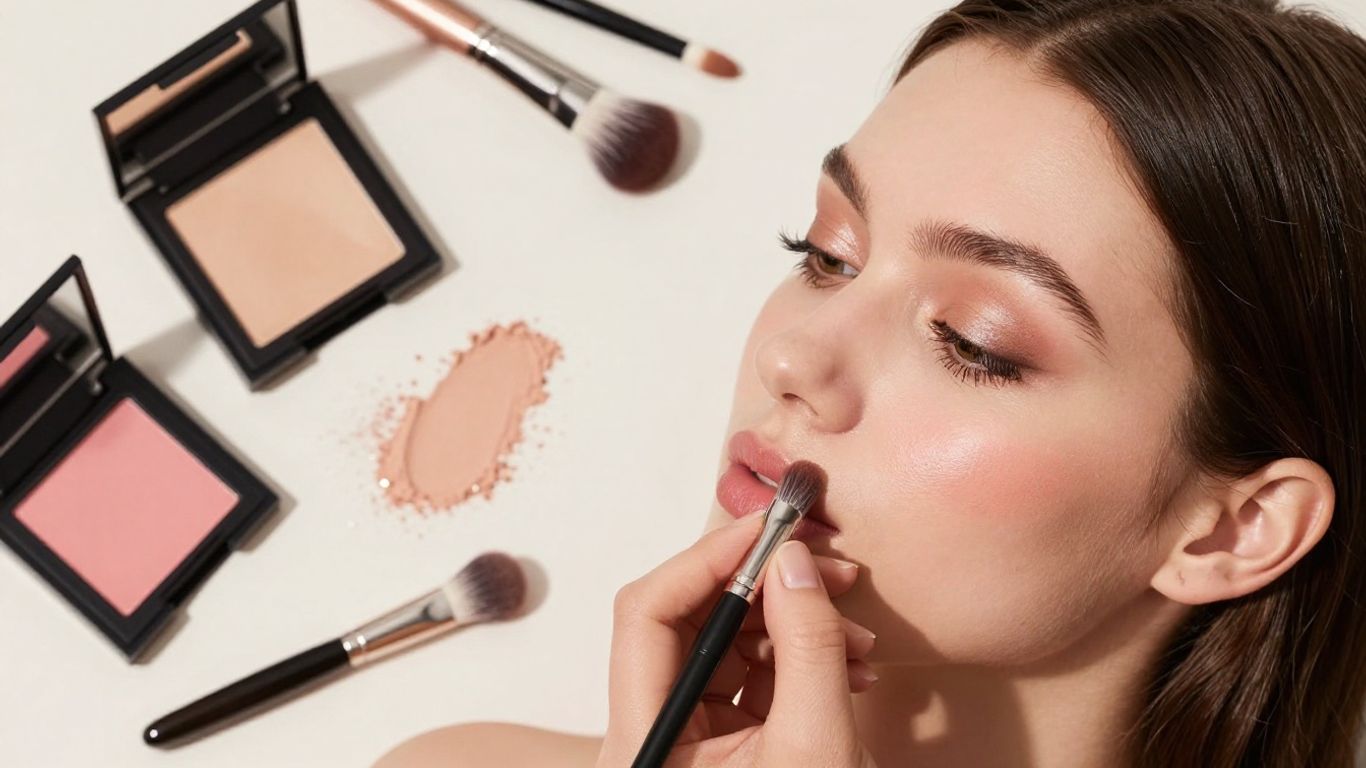
Blush is for adding life back to your face. Think of it as a healthy flush. You want to apply it to the apples of your cheeks. These are the parts that pop out when you smile. Blend it upwards towards your hairline. This lifts your face. For a softer look, use a lighter hand. Different shades can work beautifully together. You can mix them or use them separately.
Contour is all about creating shadows. It defines your bone structure. You'll want to apply it right under your cheekbones. Start from your ear and go towards the corner of your mouth. Stop about halfway. Also, apply it along your jawline. This can slim your face. And a little on your temples can narrow your forehead.
Highlighter is your glow-getter. It catches the light. Apply it to the high points of your face. This includes the tops of your cheekbones. Also, the bridge of your nose. A little on your cupid's bow makes your lips look fuller. And dab some on your brow bone. The highlighter gives you that perfect gleam.
Here's a quick cheat sheet:
-
Blush: Apples of cheeks, blend up.
-
Contour: Under cheekbones, jawline, temples.
-
Highlighter: Tops of cheekbones, nose bridge, cupid's bow, brow bone.
Remember, these are guidelines. Your face is unique. Play around to see what looks best on you. It's all about enhancing your natural features. Don't be afraid to experiment. You might discover a new favorite spot!
For a really natural look, try applying blush just slightly higher than the apples, closer to your temples. It gives a more lifted effect. Contour placement can also be adjusted based on your face shape. If you have a rounder face, you might bring the contour down a bit further along the jawline.
Think of these steps as building blocks. Each product has its place. When applied correctly, they work together. They create dimension and radiance. It's like painting on your face, but way easier. Getting started is simple. You can find more tips on setting powder if you want your makeup to last even longer.
Pro blending tips for a seamless finish
Blending is where the magic happens. It's what makes your makeup look like it's part of your skin, not just sitting on top. Don't rush this part. Take your time.
Start with your blush. You want it to look like a natural flush. Use a fluffy brush and gentle, sweeping motions. Think about where your cheeks naturally get color when you're happy or a little warm. A little goes a long way. You can always add more, but it's harder to take away.
Contour is all about creating shadows. Blend it downwards and slightly outwards. You're mimicking how light naturally falls. If you put on too much, it can look muddy. Soft, circular motions work best here. The shades are buildable.
Highlighter should catch the light. Blend it upwards, towards your hairline. You want a glow, not a stripe. A smaller brush can give you more control. For a subtle sheen, use a lighter hand. For more pop, layer it a bit.
The key is to work in light layers and blend as you go.
Here's a quick rundown:
-
Blush: Blend upwards and outwards towards your temples.
-
Contour: Blend downwards and slightly inwards towards your jawline.
-
Highlighter: Blend upwards along your cheekbones.
Don't be afraid to use a clean brush to soften any harsh lines. This is called 'buffing'. It just means going over the edges with a clean brush to make everything melt together. It's like giving your makeup a final polish. You can also use a damp sponge for a dewy finish. Just press it gently over the blended areas.
Sometimes, you might end up with a line that's too sharp. That's okay. Grab a clean brush, maybe one you used for powder, and just gently sweep it over the edge. It's like erasing the mistake without removing the product. You can also use a bit of setting powder to help diffuse any edges that are too strong.
Remember, practice makes perfect. Your face is unique, so what works for someone else might need a little tweaking for you. Experiment with different brushes and techniques. You'll find your groove.
Using the Lustre & Lume Blush Duo and Lustre & Lume Contour/Highlighter Palette
Let's talk about putting it all together with the Lustre & Lume Blush Duo and Lustre & Lume Contour/Highlighter Palette. This is where the magic happens for your blush contour highlight tutorial. It makes things so much simpler.
Think of this palette as your all-in-one kit. The blush duo gives you options. You can mix the matte and shimmer shades. Or use them alone. This is great for how to apply blush for beginners. You get a natural flush or something more dramatic.
The contour shade sculpts your features. The highlighter adds a beautiful glow. It's all about placement. Remember where we talked about putting each product? This palette makes it easy to follow those steps.
Here’s a quick guide for using the Lustre & Lume palette:
-
Blush: Apply to the apples of your cheeks. Blend upwards towards your temples. Use the matte shade for a soft look. Add the shimmer shade on top for a little extra pop.
-
Contour: Use a brush to pick up the contour shade. Apply it just below your cheekbones. Also, along your jawline and temples. Blend well so there are no harsh lines.
-
Highlighter: Sweep this onto the high points of your face. Think cheekbones, brow bone, and the bridge of your nose. This is key for powder highlighter application.
This palette is designed to work together. The shades are balanced. They help you achieve a professional look without a lot of fuss. It simplifies your routine.
Don't be afraid to experiment. The beauty of this palette is its versatility. You can adjust the intensity. Play with the contour and blush placement. You'll find what works best for your face shape. Check out the full range of Fable Cosmetics products to see how this palette fits into your collection. The blush duo is a fan favorite for a reason!
Common mistakes and how to fix them
It happens to everyone. You're trying to get that perfect glow, and suddenly, you look in the mirror and... oops. Don't worry, we've all been there. Let's talk about a few common slip-ups and how to fix them.
Too Much Product
This is probably the most frequent issue. You dip your brush in, and it comes out loaded. Or maybe you're just a little heavy-handed. The result? Streaks or a color that's way too intense. The fix is simple: blend, blend, blend.
-
Blush: If it looks clown-like, grab a clean fluffy brush and gently buff it out. You can also try patting a little bit of your foundation or setting powder over it to tone it down.
-
Contour: Muddy or too harsh lines are the enemy. Use a clean brush to soften the edges. Sometimes, a bit of your regular powder can help diffuse the color.
-
Highlighter: Disco ball alert! If it's too much, use a damp sponge or a clean brush to sheer it out. A light dusting of translucent powder can also help.
Wrong Placement
Putting blush too low can make your face look droopy. Contour placed too high or too low can alter your face shape in ways you didn't intend. Highlighter that's too far out on your cheekbones can emphasize texture.
-
Blush: Aim for the apples of your cheeks, blending upwards towards your temples. Think of it as lifting your face.
-
Contour: Stick to the hollows of your cheeks, your temples, and along your jawline. It's about creating shadows, not drawing lines.
-
Highlighter: Apply it to the high points: top of your cheekbones, brow bone, and the bridge of your nose. The palette makes it easy to find the right spots.
Poor Blending
This is where things can look patchy or unnatural. You can see distinct lines between products. It's like wearing a mask instead of having makeup meld with your skin.
-
Tools Matter: Make sure your brushes are clean. Dirty brushes can move product around unevenly. A damp beauty sponge is your best friend for blending foundation and cream products.
-
Build Gradually: It's always easier to add more product than to take it away. Start with a little, blend, and then add more if needed. This is especially true when using cream blushes or contour sticks.
-
Buffing Motion: Use light, circular motions to blend. Don't just swipe. Think of buffing the product into your skin for a natural look.
Sometimes, the best way to learn is by making a few mistakes. Don't get discouraged if your first few attempts aren't perfect. Makeup is forgiving, and with a little practice, you'll get the hang of it. It's all about experimenting to see what works best for your unique features.
Ignoring Your Skin Type
Using the wrong formulas can lead to issues. Powders can look dry on mature or dry skin. Creams might slide off oily skin.
-
Dry/Mature Skin: Opt for cream or liquid formulas for blush and highlighter. They add a dewy finish.
-
Oily Skin: Powders tend to work best. They can help absorb excess oil and stay put longer. A light dusting of powder over cream products can also help set them.
-
Normal/Combo Skin: You have the most flexibility! You can use powders, creams, or liquids. See what you prefer.
We all make mistakes when putting on makeup, but don't worry! It's easy to fix common slip-ups. Want to learn how to avoid these blunders and get a flawless look every time? Visit our website for tips and tricks that will help you master your makeup routine. You'll be a pro in no time!
Conclusion
Mastering blush, contour, and highlighter application is an achievable skill that enhances your natural features. By understanding the purpose of each product, using the right tools, and applying them in the correct order and placement, you can create a beautifully sculpted and radiant look. Remember that practice and experimentation are key to discovering what works best for your unique face shape and skin type.
Frequently Asked Questions
What's the difference between blush, contour, and highlighter?
Think of blush as adding a healthy flush to your cheeks, like you've just been for a brisk walk. Contour is all about creating shadows to define your features, kind of like drawing subtle lines to shape your face. Highlighter is the opposite; it catches the light to bring certain areas forward, making them pop and glow.
What makeup tools do I really need?
You don't need a ton of fancy brushes! For blush, a fluffy brush works great. For contour, a smaller, angled brush helps you be more precise. And for highlighter, a small fan brush or even your fingertip can do the trick. Blending sponges are also super helpful for making everything look smooth.
In what order should I apply these products?
Generally, you'll want to apply your base makeup first (like foundation and concealer). Then, go in with contour to shape your face, followed by blush to add color. Finally, finish with highlighter to make your best features shine. It's like building your look layer by layer!
Where exactly do I put blush?
For a natural look, smile a little and apply blush to the apples of your cheeks – that's the fullest part when you smile. You can blend it upwards towards your temples for a lifted effect. It's all about finding where your cheeks naturally get rosy.
How do I contour my face?
Contour is usually placed in the hollows of your cheeks (under your cheekbones), along your jawline, and on the sides of your nose to create definition. You want to mimic natural shadows, so think about where the sun wouldn't hit your face directly.
Where should highlighter go?
Highlighter is your spotlight! Apply it to the high points of your face: the tops of your cheekbones, down the bridge of your nose, on your brow bone (just under your eyebrow), and on your cupid's bow (the little dip above your upper lip). It's where light naturally hits.
How can I make my makeup look blended and not streaky?
The key is blending, blending, blending! Use light, feathery strokes with your brush or a damp sponge. Start with a little product and build it up. Always blend upwards and outwards, following the natural contours of your face. Patience is your best friend here!
Can I use the Lustre & Lume Blush Duo and Lustre & Lume Contour/Highlighter Palette together?
Absolutely! That's exactly what they're designed for. You can use the contour shade to sculpt and the highlighter to illuminate, then add a pop of color with the blush duo. They work beautifully together to create a complete, radiant look that feels good on your skin because they're talc-free and clean.

